The Lounger Instructions
 Assembly instructions for The Lounger
While utmost care is taken in the choice of
materials and the highest standards are used in manufacturing, caring for your
chair at home will extend its life and appearance.
Assembly
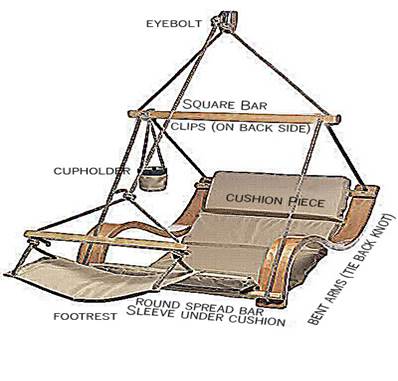
Locate all your Lounger Chair parts. Including:
- cushion piece (1)
- footrest (1)
- a set of round spreader bars (2)
- a set of bent arms attached to overhead square bar via ropes (1)
- hardware pack wrapped inside cupholder (4)
Place wooden bent arms on the ground making sure the arms are face up and that the ropes are not twisted or turned impeding the next step.
First insert the rope through the hole on the back of the bent arms and tie a small knot (The brake should be on the back side / if they are on front simply untie the front knot and reverse the clips to the back side).
Place the cushion part of the chair with the tag on the back at top right in between the bent arms on the ground.
Thread the two round spreader bars through
the sleeves underneath the cushion (one sleeve is on top and bottom of the main
cushion) .
Connect the cut away section of the round
spreader bars onto the top matching section of the bent wood arms. (Refer to
picture to make sure that the bent wood arms are set correctly).
Using the hardware provided connect the
round spreader bars to the bent wooden
arms by placing the hexbolt through the spreader bar and bent wood arms from
front to back. Bolt down firmly using the washer and nut. Repeat this procedure
in all four corners of the chair. Use the wrench to tighten the bolt until it
is flush with the front side of the wood.
Installing eyebolt
Locate ceiling joist (use stud finder or tap and verify with small nail). Be sure to locate the exact center. Predrill a starter hole using a ¼” drill bit. Screw in the supplied eyelag until all that is visible is round section. Do not loosen or adjust once in place. Caution (swinging could loosen the eyebolt and compromise the sturdiness).
Fine tuning adjustment
Your chair can be adjusted back and forward by manipulating the ropes on the overhead square bar. The brakes must be on the back side of the square bar and must sit tight against the square bar once the recline has been set.
Washing and care instructions
Using a soft brush and warm soapy water, scrub where dirty. Allow to dry hanging or on a flat surface.
Disclaimer
Please note: SwingsandChairs.com and all agents or reps thereof cannot assume responsibility for special, indirect, or consequential damages or contingent liability for use of this product in a manner not expressly intended by the manufacturer. End consumer is ultimately responsible for verifying proper installation of the eyelag/hook assembly according to guidelines explained here within.